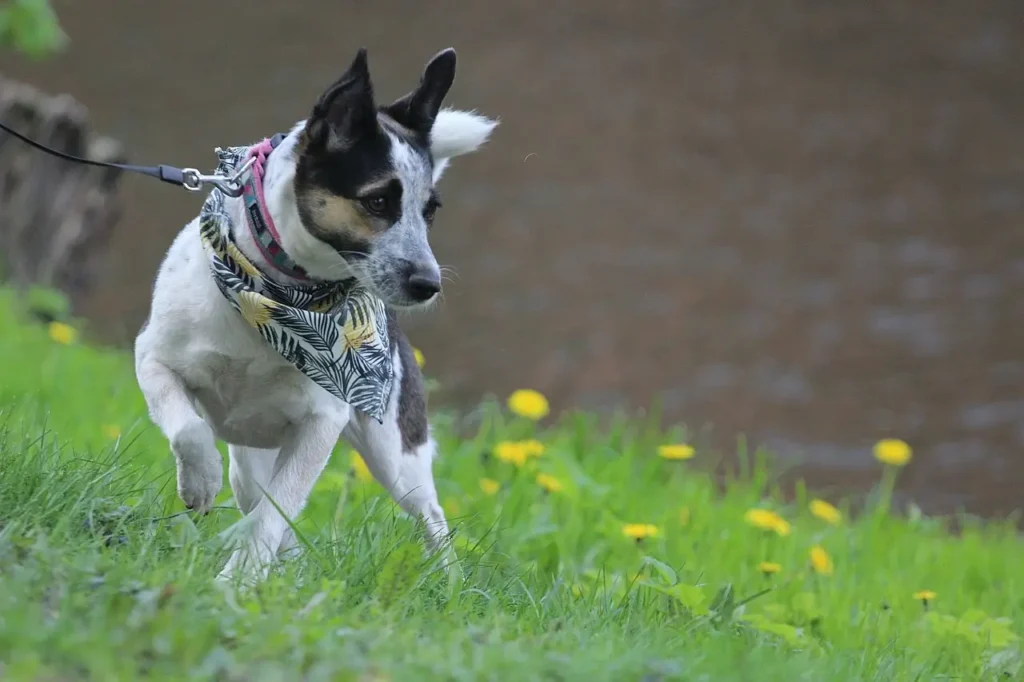
There’s something undeniably heartwarming about a dog sporting a bandana. It’s as if they’re part of a cool club that sets them apart in the most endearing way. Bandanas are like the tattoos of the dog world – each one tells a unique story. But what if that story was not unique but also custom-tailored to your furry companion’s personality? If you’ve ever wanted to spice up your pup’s wardrobe with a personalized touch, this DIY guide is the perfect starting point to create dog bandanas that will make tails wag and heads turn.
Choosing the Paw-fact Fabric
The essence of a good dog bandana is the fabric. Start by choosing a material that’s comfortable for your pet, durable, and easy to clean. If your dog has a particular fondness for clawing or chewing on their accessories, you’ll want something tough like cotton or denim. These fabrics are also breathable, which is crucial for dogs that tend to overheat easily. On the design side, the fabric’s color and pattern should reflect your dog’s personality or be themed around an event, holiday, or personal style.
What to Look For
- Quality: Opt for a high-grade fabric that won’t fray or wear out quickly.
- Design: Select a pattern or color that complements your dog’s breed and coloring.
- Function: Ensure it’s suited for the purpose, whether that means being washable or providing warmth.
- Safety: Avoid materials with small, loose fibers or harmful dyes.
Getting the Right Measurements
Measuring your dog’s neck for a bandana may sound simple, but it’s a crucial step that ensures both comfort and style. You don’t want it to be too tight or too loose – it should fit just right to avoid any potential safety hazards while maintaining that effortlessly chic look.
How to Do It
- Use a Flexible Tape Measure: Wrap it comfortably around your dog’s neck where the bandana will sit.
- Keep It Loose: Make sure you can comfortably fit two fingers between the tape and your dog’s neck.
- Write it Down: It’s easy to forget a measurement, so jot it down for future reference.
Cutting the Fabric with Love
Once you have the right measurements, it’s time to cut the fabric. This step requires steady hands, a good pair of fabric scissors, and a clear work area. Remember, measure twice, and cut once. You can always cut more material away, but you can’t add it back on.
Step-by-Step Instructions
- Lay Out Your Fabric: Smooth it out on a clean, flat surface.
- Use a Pattern: If you’re not confident with free-hand cutting, consider using a simple triangle pattern.
- Cut Slowly and Deliberately: Follow your lines closely to ensure accuracy.
- Double-check: Place the cut fabric against your pet’s neck to see if it looks about right.
Folding Into a Triangle
Most dog bandanas are triangular, so folding your fabric into the right shape is the next logical step. The most common method is folding a square piece of fabric in half diagonally to make a triangle. This step should be neat, as it forms the foundation of the bandana’s structure.
Pro Tips
- Smooth It Out: Any wrinkles in the material will affect the final look.
- Align the Edges: Make sure your edges are just right for a symmetrical result.
- Press the Fold with an Iron: This will make it easier to work with and lead to a crisp finish.
Hemming the Edges for Polish
A neatly hemmed bandana is a sign of quality craftsmanship. Not only does it look good, but it also prevents fraying and gives your bandana a longer lifespan. If you’re not an ace with a needle and thread, there are fabric glues and iron-on tapes that can help achieve a clean edge.
Options for Hemming
- Sewing: A straight stitch on a sewing machine or hand-stitching will give the most professional finish.
- Fabric Glue: Provides a quick and easy alternative to sewing.
- Iron-On Tape: A strong option that requires a little ironing skill.
Decorating Your Dog’s New Look
This is where the bandana becomes personal. Whether you add your pet’s name, some bling, or a motif that reflects their hobbies, the decoration is your opportunity to make the bandana truly your own.
Ideas for Decoration
- Personalized Patches: Order or make patches with your pet’s name or a fun slogan.
- Bling: Dog-safe sequins or rhinestones can add a touch of sparkle.
- Fabric Paint: For those skilled with a brush, paint can give you endless creative freedom.
- Appliqués: Add felt or fabric cutouts for a layered, 3-D effect.
Wearing It Proudly
The day has come to present your creation to the world – or at least to your dog. Show your pet the bandana before you put it on; some dogs may be initially wary of new things around their neck.
Presentation Tips
- Calm Energy: Remain calm and speak softly to reassure your dog.
- Positive Reinforcement: Offer treats and praise when your dog lets you put it on.
- Patience: If your dog truly dislikes it, don’t force the issue. You can try again later.
Ironing for that Extra Something
An often-overlooked step, especially for first-timers, is ironing the finished bandana. This final touch makes a surprising difference, giving the bandana a polished look that sets it apart from store-bought ones.
Why Iron?
- Smooths Out Wrinkles: Makes the bandana look brand new and well-cared for.
- Adds Weight: The slight stiffness from ironing can help the bandana sit nicer on your dog.
- Kills Germs: If you’ve washed the fabric, a quick ironing will remove any lingering bacteria.
Tying It On with Style
There are a few ways to tie a bandana, so choose the style that best suits your dog’s comfort and your sense of aesthetics. A classic knot is simple and secure, but if you’re feeling fancy, there are tutorials for more elaborate ties online.
Basic Steps
- Lay It Flat: Fold the long edge over a few times to create a band.
- Knot It: Tie behind your dog’s neck, ensuring it’s not too tight or too loose.
- Adjust: Slide the knots to the center if needed for a balanced look.
In Conclusion: A Fresh Spin on Doggy Fashion
Making a custom dog bandana is a fun and rewarding project that lets you express your creativity while pampering your pet with a unique accessory. By following these step-by-step instructions, you’ve not only crafted an item of clothing but a statement piece that speaks to your dog’s individuality. In a world where dog fashion is increasingly about mass-produced items, your dog’s one-of-a-kind bandana will be the envy of the local dog park. Set aside an afternoon, gather your materials, and start sewing – or gluing, or ironing – your way to a canine wardrobe staple.
Did you find this article helpful? Check out the rest of our blog for more!